How I Make My Watercolor Paintings Muddy
You must be wondering, how is it I make my watercolor paintings muddy? Or why it happens to your paintings?
I love color. And I work very hard to keep my paintings vibrant and colorful. But sometimes muddy paintings happen.
Here Are a Few Tips
If you want to keep your colors popping in your painting, I suggest you change your water every time it gets dirty, or every time you change colors. For example, if you are painting with green and you switch to rose, that is a recipe for mud. A helpful tip is to have several containers of water for different colors, that way you don’t have to change water so often.
Complimentary Colors
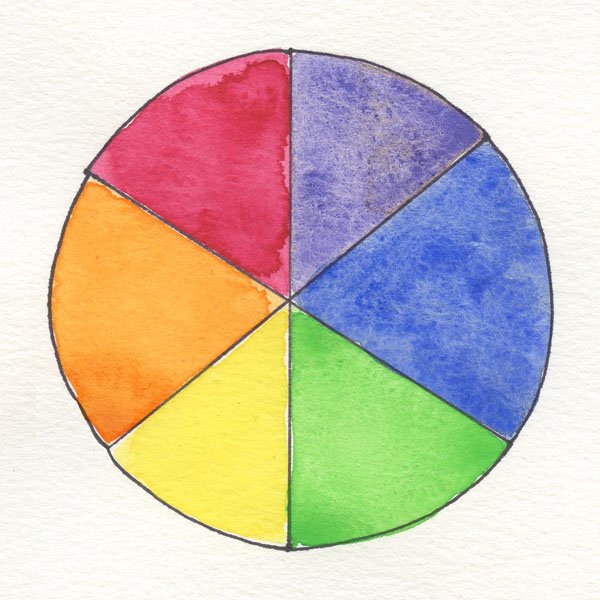
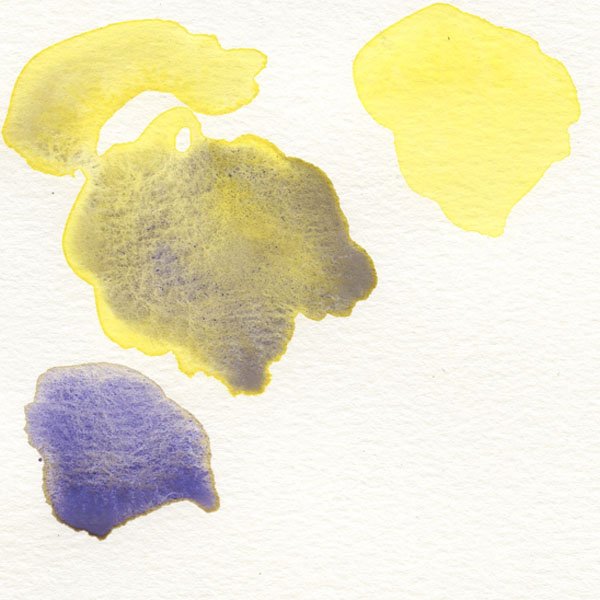
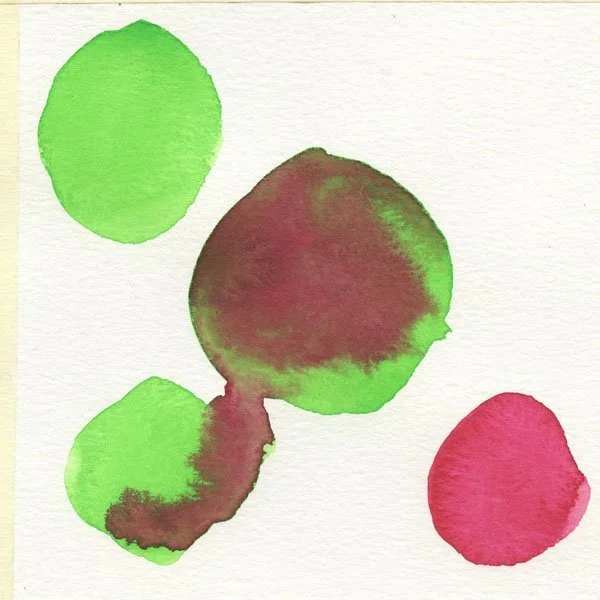
Be particularly aware when you are painting with complimentary colors. Colors like green and red, blue and orange, or violet and yellow that are on the opposite side of the color wheel and when they are mixed, they make muddy colors.
Muddy colors can happen when you allow complimentary colors to bleed into each other. So if there are places in your painting where these colors touch, let the painting dry in-between before you apply the second color.
Complimentary Color on the Color Wheel
Violet & Yellow
Blue & Orange
Green & Red
Violet running into Yellow
Colors lose their brilliance
Opaque Colors are less muddy.
Let Your Painting Dry
That brings me to a subject that I strongly believe in: LET YOUR PAINTING DRY before you add another color on top of another color. Let your painting dry unless you want the colors to blend and you know the results will be wonderful.
You are in control of how the painting progresses. And watercolor likes to do its own thing, sometimes for the better, but sometimes it just muddies the water. Letting your painting dry, gives you some control. Let your painting dry.
Know When to STOP
Learning when to stop and recognizing that your painting is done is an art. Knowing when to stop is something you have to learn. And the only way to really learn to stop is to over paint an area or a whole painting and feel that sick, sick feeling of, if I only would have stopped my painting would not have been ruined. Believe it or not, that feeling will stay with you as a reminder to STOP.
When I teach, I warm my students that as they paint and I see them begin to overdo it, I will shout, STOP! It is for their own good and most of the time when it happens, they already know they have gone too far. They already are experiencing the trauma of a ruined painting.
Muddy Colors Happen
I also teach that muddy paintings happen to everyone and that is how you learn. My students know they are allowed to take their painting off the board and throw it in the trash. I will bring the trash can to them if they ask. They laugh and take it as a lesson learned. They know I am right there with them, with my ugly colors and trash bound paintings.
Sometimes Muddy Colors are Intentional
Take a look at the Dogwood painting below. It is an unfinished painting that I am still working on to darken parts of the background and add detail.
In the background I am adding rose and green along with indigo blue and burnt sienna, a light reddish brown. The muddy colors are intentional as I am careful to keep the colors interesting, not ugly.
Unfinished Dogwood Painting
This is accomplished by letting the paint dry and work in layers of light washes, more water than pigment. The process is sometimes called glazing. As I place one color on top of another I stop and allow my painting to dry thoroughly. I plan to keep some of the background light, some a medium tone, and selected areas I will go darker to hopefully obtain a good contrast in the painting.
Fritz Van Eden, a well-established artist shared this secret when I was first learning to paint. He explained to his students that creating ugly colors can help make the other colors in the painting brighter. This is something I think about all the time when I paint because color is so important to me.


